Showing posts with label house. Show all posts

Wednesday, March 21, 2012

Use It or Lose It: Round 2

In that same Closet of Doom, I had 4 mirrors that I'd meant to do something with for, well, awhile. But they were buried deep.


Last weekend I decided to work on spiffing up our front entryway. It's nice enough, but kind of dark. Some of that is the paint color, some of that is that it doesn't get much natural light except in the morning.


I figured that a mirror over the dresser would look good, and I had the perfect one for the job.


I found it last fall in an antique-y flea market kind of place and fell in love with the shape and the detailing at the top.


Here's where I decided to put it:


Some eye-balling (by me) and measuring (by Steve) later, it was up.


Ah, perfect.

I also had another mirror that I wanted to hang. Originally I only wanted the frame and was going to re-use the mirror somewhere else, because together they are REALLY heavy. I forgot to take a picture of the mirror itself, and the wall before, but here's where it ended up:


It's the long wall in the middle of the house. It'd be perfect for a gallery wall, but everytime I see a bunch of frames together on a wall I think how cool it looks, yes, but also, "Yeah. Soooo don't want to dust all those..." which makes it perfect for this mirror.

I had to have Steve hang it because I couldn't lift it that high without toppling over.


Then he checked to see if was level and all that:
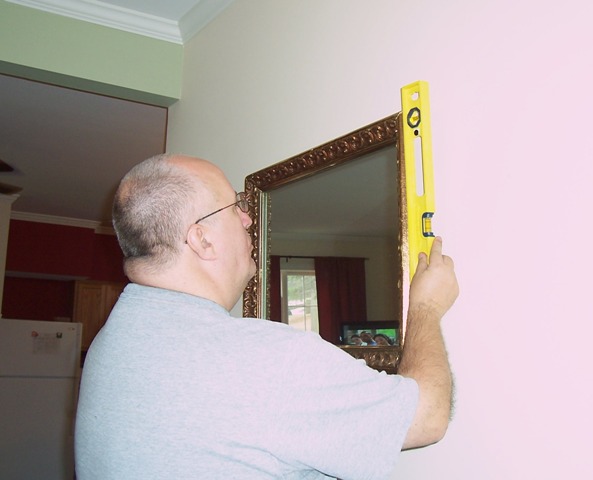

Here it is, waiting for other things to be put up around it so it doesn't look like a random mirror on a random wall:


Here's a closer view of some of the detailing:


And just like that, two more things used. The other 2 mirrors are just awaiting their call to be useful. I know where I'm probably going to use them too. No, not back in the closet.

Running score: USE IT=2, LOSE IT=0

Wednesday, March 14, 2012

Use It or Lose It: Round 1

Buried in the side of the Closet of Doom were a couple of curtain rods that I'd originally bought last July to put in my husband's home office.


I could only find 2 at the time, but then he decided that he didn't want curtain rods (he has a sort of set of 3 windows in there), but wanted something like what I'd done in the laundry room instead.

I thought maybe I'd use them in my office instead, but hadn't gotten around to it yet. The more I looked at them, though, the more I thought they'd be too dark against the lighter colors.

Then one day I was walking down the hall and looked at the living room curtains and thought, "I really should take those down and wash...HEY! Those curtain rods would be PERFECTLY PERFECT IN HERE!!!!!" And, even better yet, the curtain rods that were currently in the living room would be PERFECTLY PERFECT in my office.

Here's where we started:

Living Room

Living Room

My Office

My Office

It should have been easy enough...but there were a couple of things I didn't forsee. Like the fact that to get the curtains back on the window in the living room that faces the driveway would be near impossible without taking down the brackets and threading the rod through first. Or the whole measuring thing (that always gets me, though).

In the end I perserved, and now have nifty looking curtain rods in the living room and actual curtains/curtain rods in my office.


Yes, I know the center bracket is off-center. It's where Steve's brother had originally put in the rod that's now in my office. We figured it'd be easier to re-use as many holes as we could. I can live with it...for now.


This is probably why Steve hates doing any home improvement projects with me. They tend to snowball. 'Install 2 curtain rods' became 'take down the living room curtains and curtain rods, then install 2 curtain rods, then install the 2 rods that were just taken down in another room, oh and add curtains'. And yes, it took about 3 hours. I don't think it would've normally taken that long had I not had to go back and re-do the shorter living room wall in order to thread the rod through the bracket BEFORE attaching said bracket to the wall.

Whatever.

It's DONE! And I like the darker rods in the living room against the red curtains. And I LOVE that I have curtains in my office. That helps finish a room.

USE IT=1, LOSE IT=0

Friday, March 9, 2012

Use It or Lose It

Once upon a time, I cleared out and repainted the upstairs storage closet (also known around here as 'The Storage Closet of Doom' for good reason).

It was all organized and pretty. I could walk in and out without fear I'd be buried in crap treasures:


Sadly, it doesn't look like that anymore. No, now it's even worse than it was before I re-painted it in 2010. The level of stuff is waist-deep on me (I'm only 5'0", so yes, it's not SUPER deep, but it's deep enough, thanks).

See?


Now, this has been bothering me for a couple of months, but I rationalized it by saying, "Eh, either the space that I want to put (insert item name here) in isn't ready for it, or I can't paint it yet. No big deal. It can wait."

Well, that was super great...until I actually needed something out of the closet. The BACK of the closet. And to get to it, I had to make a path. As I was taking yet another armload of treasures out, I realized 1) How much stuff was actually IN that closet, and 2) What a great job I'd done getting it all to fit. (Or something like that. Work with me here.)

In January, one of my favorite blogs, Young House Love had a post talking about the same issue: A Strange Self-Imposed Challenge. They said the same thing I said: Stop hoarding things, start using them (I'm paraphrasing here). They're doing a "Dude, Get On That Already" series with their treasures. It inspired me to get cracking on my hoard
treasures too.

It's time to go through the piles and make a decision on each thing. If I wait for the perfect place/time to use these things, well, that's never going to get here. A home is always a work in progress...well, at least for me. Steve is a trooper for putting up with my always changing things, and I know he's secretly relieved when Home Improvement Season is done for the year.

So, with that, it's Use It or Lose It time.

Let the Games begin.

Saturday, November 26, 2011

365 Photos Day 327


327/365

Today I'm grateful for our house. We are incredibly lucky to have gotten to build this house pretty much how we wanted it. We wanted it to look like a house that had been there for 100 years (like our old one was), and like we'd inherited it from one of our grandmas and updated it. I think we succeeded.

Mostly, though, I'm just grateful that we have a house that we can afford and that we can raise our family in (although the Kid will be leaving for college next fall), and maybe pass it down to the Kid.

Tuesday, October 25, 2011

365 Photos Day 296


296/365

Since I couldn't watch the football game I wanted to watch on Sunday, I decided it was a good time to finish up some non-painting house projects.

Have I ever said how much I hate puzzles? No? Well, I do. Not as much as I hate Brussel sprouts, but pretty close.

Anyhow, sometimes I shouldn't be allowed to put something together without supervision from a left-brained person.

I couldn't figure out why in the world my crown molding would NOT line up correctly. Seriously. Took me almost 2 hours to realize that I had flipped one of the pieces the wrong way when I cut it, so NO. There was less than no chance it would EVER line up correctly.

And did I buy enough molding to account for any mistakes?

C'mon, now. You should already know the answer to this one...

NO. I surely did not.

Sigh.

Saturday, October 22, 2011

365 Photos Day 295


295/365

19 Hefty bags, 5 hours, and 3 tanks of gas later, the annual yard cleanup has been deemed a success, thanks to my sweet husband, Stevie E.

All family members present at this event agreed that it "was way more fun than anyone should have in one day" and they "look forward to not doing it again anytime real soon."

Saturday, October 15, 2011

31 Days of Pinterest: Day 14 Wood Valance Window Treatment


This project wasn't nearly as hard as I thought it might be. Mostly because I didn't add any cool moulding or doo-dads, but hey.

I can't remember if I originally saw this one on Pinterest or over on the I Heart Naptime blog (which I read), but either way, it's one of those projects that add some visual oomph to a room without much effort.

I used a pre-cut 48" 1"x6" aspen board and 2 pieces of scrap wood from another project. The scrap wood was also from a 1x6, so I didn't have to cut them.

Last summer when I was deconstructing our master bedroom closet, I saved the pole holders in case I decided to do a double rod configuration. I didn't, so I decided this would be a good project to re-use them on. I screwed them in about the center of the scrap wood pieces.

Then I fastened the scrap wood sides to the main board using Elmer's Wood Glue and corner brackets.

I also had a closet clothes pole from the closet re-do, and it was almost the perfect length. I marked the length and cut it with the chop saw.

Before I went too much farther, I put everything together to make sure everything was straight and level.


I let the glue set overnight and had the Kid pick up some more brackets for me. She couldn't find the ones I'd used, but did find some other L-brackets. I put those on the sides and removed the corner brackets and used those to fasten the wooden valance to the wall instead.


Finally it was time to get out the table runner that I was going to use as a valance.

I found it at Goodwill for $1.99. Seriously.

I used curtain rings that clipped on to the fabric and threaded it on the clothes pole and put it into place.

I haven't decided whether to paint the wood or not yet. I like the natural wood, so I'm probably just going to leave it for now. And just like that, I'm one step closer to being done with the laundry room (!!!).

To see my other 31 Days of Pinterest projects, click on the image below, and it will take you to my original post.

Thursday, October 13, 2011

31 Days of Pinterest: Day 12 Wooden Bowl Thingy on a Pedestal


Yes, that's the official name of the project. Well, it's what I have it labeled as on my Pinterest board, anyhow.

I first saw this project on one of my favorite-ist blogs ever, The House of Smiths. No, it wasn't called a "wooden bowl thingy on a pedestal" there. It was actually in her Halloween decorating post from last year. Yes, I've been meaning to make one for about that long. Yes, I am a master procrastinator.

Although her wooden stand was purchased at the Salvation Army thrift store, the more I looked at it, the more I thought if I found the right components I'd be able to build my own. Or glue my own. Whichever.

I figured if I could find some wooden bowls and some flat topped candlesticks I'd be in business. I hit up two of my favorite Goodwill stores in search of the perfect ones, and found them for under $6 total.
The candle holders were $1.99 each, and the bowls were $.99 cents each.

Once I had everything together, I was looking at the bottoms of the bowls and the tops of the candleholders. The bowl has an indent that matched the diameter of the top of the candleholders pretty well.

I was looking at the candleholders trying to decide which would look better and/or be easier to do: put the flat side up (which is the bottom), or keep it like it was supposed to be, with the flat side down.


In the end, I decided to put the flat side on the bottom, and just glue the heck out of it all and let it set. I used my trusty Elmer's Wood Glue.


I set the bowl on the top, then flipped them over and set some scrap wood on them overnight to help clamp them for a better hold.

And here they are, all done. I thought about painting them, but I really like the natural wood colors, which actually match (not planned, just a happy coincidence).


To see my other 31 Days of Pinterest projects, click on the image below, and it will take you to my original post.

Wednesday, October 12, 2011

365 Photos Day 283


283/365

I was doing a project from my Pinterest boards, which was to run the dishwasher using Lemonade Kool-Aid as a cleaner (without the dishes in there...although that would have added another layer of interest for sure).

Then I realized that I had no idea what half the buttons for the dishwasher are for. So, I hit a bunch and hoped for the best.

Maybe I should look for the user's manual.

Nah. That'd take all the fun out of it.

Tuesday, October 11, 2011

31 Days of Pinterest: Day 11 Cleaning the Cutting Board with a Lemon


In the spirit of "Clean All the Things" using lemon-y kinds of things, I thought I'd give this project a whirl.

From the description on the pin:


Lemon as Cutting Board Cleaner - To remove tough food stains from light wood and plastic cutting boards, slice a lemon in half, squeeze onto the soiled surface, rub, and let sit for 20 minutes before rinsing. The best part? You'll have a house that smells like a lemon grove rather than chemicals.

We have about the same cutting board as what's shown in the picture. The instructions are easy enough: Cut the lemon, squeeze the juice on the cutting board, scrub it in, and let it sit for 20 minutes.

After 20 minutes, here's what I had:

Huh. Well, I still had half a lemon, so I gave it another go.

20 minutes later, I had...

I can see a couple of places where it made a difference. Maybe it's because the cutting board is old. Maybe I needed more lemon juice. Maybe I just need to move on from trying to clean things with lemons today.

To see my other 31 Days of Pinterest projects, click on the image below, and it will take you to my original post.