I have a confession to make. I'm no artist. Wait, this isn't news?
I do, however, have a talent for mentally deconstructing someone else's projects and figuring out how to recreate them. Most of the time that's as far as it gets, but when I saw this beadboard flag at the Simply Kierste blog, I knew I could actually do this.
No, seriously. I had everything I needed downstairs in the basement.
I had lots of beadboard from when we built the house--it was used on the underside ceiling of the front porch:
I had the paint:
And I had the Frog Tape I love so very much.
I started by cutting a length of the beadboard to 3 sections of 16"x20", and hammered them together. The pieces are tongue and groove, but still need a bit of er, "persuading" every so often.
Once I got them together, they were kind of wobbly, so I nailed some 1" lattice on the back as stabilizers.
Although the pieces were the color that I wanted the base to be (kind of an off-white), it was outdoor paint. I hit it with some spray primer, then went over it with a couple of coats of Rustoleum's Heirloom White.
Once that had cured, I taped off the corner where I wanted the blue, and just started painting. I don't have any pictures because I inadvertently deleted them instead of saving them.
But the instructions on the original pin are very good, so follow them.
I cut out a reverse stencil of the star from cardstock, and held it in place when I painted the blue. I wasn't worried about crisp lines because that's not what this project is about. It's supposed to look like it's been around for awhile.
I also taped off the different rows of color because the blending of colors was bothering me. That added more time to the overall project because I couldn't tape on wet paint.
Here's the finished flag:
I'm undecided whether to leave it like this or to distress it with a palm sander. I'm not loving the shiny red, but maybe once I hit it with a good sanding it'll calm down some.
Start to finish, this was a approximately 4 hour project. Most of that was waiting for sections of paint to dry so I could tape off the next color and go.
To see my other 31 {More}Days of Pinterest projects, click on the image below, and it will take you to my original post.
Showing posts with label decorating. Show all posts
Monday, October 8, 2012
Wednesday, March 21, 2012
Use It or Lose It: Round 2
In that same Closet of Doom, I had 4 mirrors that I'd meant to do something with for, well, awhile. But they were buried deep.
Last weekend I decided to work on spiffing up our front entryway. It's nice enough, but kind of dark. Some of that is the paint color, some of that is that it doesn't get much natural light except in the morning.
I figured that a mirror over the dresser would look good, and I had the perfect one for the job.
I found it last fall in an antique-y flea market kind of place and fell in love with the shape and the detailing at the top.
Here's where I decided to put it:
Some eye-balling (by me) and measuring (by Steve) later, it was up.
Ah, perfect.
I also had another mirror that I wanted to hang. Originally I only wanted the frame and was going to re-use the mirror somewhere else, because together they are REALLY heavy. I forgot to take a picture of the mirror itself, and the wall before, but here's where it ended up:
It's the long wall in the middle of the house. It'd be perfect for a gallery wall, but everytime I see a bunch of frames together on a wall I think how cool it looks, yes, but also, "Yeah. Soooo don't want to dust all those..." which makes it perfect for this mirror.
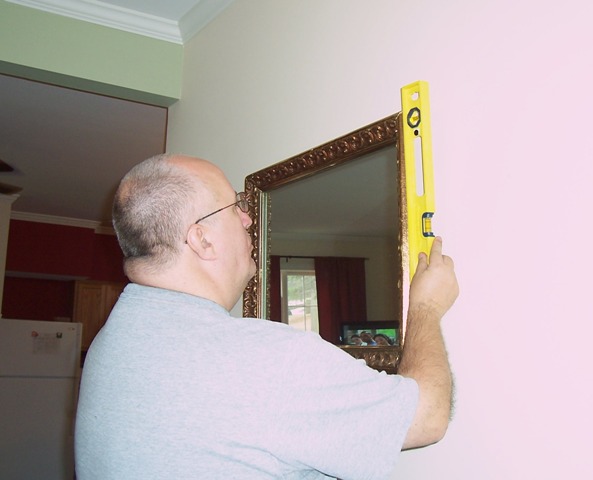
I had to have Steve hang it because I couldn't lift it that high without toppling over.
Then he checked to see if was level and all that:
Here it is, waiting for other things to be put up around it so it doesn't look like a random mirror on a random wall:
Here's a closer view of some of the detailing:
And just like that, two more things used. The other 2 mirrors are just awaiting their call to be useful. I know where I'm probably going to use them too. No, not back in the closet.
Running score: USE IT=2, LOSE IT=0
Last weekend I decided to work on spiffing up our front entryway. It's nice enough, but kind of dark. Some of that is the paint color, some of that is that it doesn't get much natural light except in the morning.
I figured that a mirror over the dresser would look good, and I had the perfect one for the job.
I found it last fall in an antique-y flea market kind of place and fell in love with the shape and the detailing at the top.
Here's where I decided to put it:
Some eye-balling (by me) and measuring (by Steve) later, it was up.
Ah, perfect.
I also had another mirror that I wanted to hang. Originally I only wanted the frame and was going to re-use the mirror somewhere else, because together they are REALLY heavy. I forgot to take a picture of the mirror itself, and the wall before, but here's where it ended up:
It's the long wall in the middle of the house. It'd be perfect for a gallery wall, but everytime I see a bunch of frames together on a wall I think how cool it looks, yes, but also, "Yeah. Soooo don't want to dust all those..." which makes it perfect for this mirror.
I had to have Steve hang it because I couldn't lift it that high without toppling over.
Then he checked to see if was level and all that:
Here it is, waiting for other things to be put up around it so it doesn't look like a random mirror on a random wall:
Here's a closer view of some of the detailing:
And just like that, two more things used. The other 2 mirrors are just awaiting their call to be useful. I know where I'm probably going to use them too. No, not back in the closet.
Running score: USE IT=2, LOSE IT=0
Friday, March 9, 2012
Use It or Lose It
Once upon a time, I cleared out and repainted the upstairs storage closet (also known around here as 'The Storage Closet of Doom' for good reason).
It was all organized and pretty. I could walk in and out without fear I'd be buried incrap treasures:
Sadly, it doesn't look like that anymore. No, now it's even worse than it was before I re-painted it in 2010. The level of stuff is waist-deep on me (I'm only 5'0", so yes, it's not SUPER deep, but it's deep enough, thanks).
See?
Now, this has been bothering me for a couple of months, but I rationalized it by saying, "Eh, either the space that I want to put (insert item name here) in isn't ready for it, or I can't paint it yet. No big deal. It can wait."
Well, that was super great...until I actually needed something out of the closet. The BACK of the closet. And to get to it, I had to make a path. As I was taking yet another armload of treasures out, I realized 1) How much stuff was actually IN that closet, and 2) What a great job I'd done getting it all to fit. (Or something like that. Work with me here.)
In January, one of my favorite blogs, Young House Love had a post talking about the same issue: A Strange Self-Imposed Challenge. They said the same thing I said: Stop hoarding things, start using them (I'm paraphrasing here). They're doing a "Dude, Get On That Already" series with their treasures. It inspired me to get cracking on myhoard
treasures too.
It's time to go through the piles and make a decision on each thing. If I wait for the perfect place/time to use these things, well, that's never going to get here. A home is always a work in progress...well, at least for me. Steve is a trooper for putting up with my always changing things, and I know he's secretly relieved when Home Improvement Season is done for the year.
So, with that, it's Use It or Lose It time.
Let the Games begin.
It was all organized and pretty. I could walk in and out without fear I'd be buried in
Sadly, it doesn't look like that anymore. No, now it's even worse than it was before I re-painted it in 2010. The level of stuff is waist-deep on me (I'm only 5'0", so yes, it's not SUPER deep, but it's deep enough, thanks).
See?
Now, this has been bothering me for a couple of months, but I rationalized it by saying, "Eh, either the space that I want to put (insert item name here) in isn't ready for it, or I can't paint it yet. No big deal. It can wait."
Well, that was super great...until I actually needed something out of the closet. The BACK of the closet. And to get to it, I had to make a path. As I was taking yet another armload of treasures out, I realized 1) How much stuff was actually IN that closet, and 2) What a great job I'd done getting it all to fit. (Or something like that. Work with me here.)
In January, one of my favorite blogs, Young House Love had a post talking about the same issue: A Strange Self-Imposed Challenge. They said the same thing I said: Stop hoarding things, start using them (I'm paraphrasing here). They're doing a "Dude, Get On That Already" series with their treasures. It inspired me to get cracking on my
It's time to go through the piles and make a decision on each thing. If I wait for the perfect place/time to use these things, well, that's never going to get here. A home is always a work in progress...well, at least for me. Steve is a trooper for putting up with my always changing things, and I know he's secretly relieved when Home Improvement Season is done for the year.
So, with that, it's Use It or Lose It time.
Let the Games begin.
Tuesday, November 8, 2011
365 Photos Day 309
309/365
A good friend of mine asked me for help in rearranging and decorating her apartment. She looks at my house and wishes she was "as creative as [me]." Funny thing is, I don't think I'm very creative at all. I look at LOTS of interior design books and blogs and Pinterest for inspiration because I can copy things fairly OK even when I'm putting my own spin on things.
It actually took the process of buying a home to help me look beyond what I can see on the surface. I remember when we started looking for a house, there were things I just could NOT get past...like the "Wow, that's sure an interesting choice of carpet/wall color/whatever." You know, things that can be CHANGED. Now, though, I can see possibilities in things, which in turn has really helped me look at spaces differently, which has helped me feel like there's a chance that someday I'll be as creative as I'd like to be.
Tuesday, November 1, 2011
31 Days of Pinterest: Day 29 Faux Burlap Thanksgiving Printable
I know it's possible to actually print on burlap. I've seen some projects where it's been done, and I kind of like the rustic look. However, as I don't have any burlap handy, this is the next best thing. I've had it in my project file since last year (pre-Pinterest), so I had to go back and remember where I first saw it.
I found the one I pinned at Megan Homemade, but she got it from Craftily Ever After, where there are LOTS of really neat printables and projects.
To see my other 31 Days of Pinterest projects, click on the image below, and it will take you to my original post.
31 Days of Pinterest: Day 28 Give Thanks Printable
Since I really didn't do much Halloween decorating, I figured that maybe if I started early I might get some Thanksgiving things up.
One of the easiest ways to do this is by using some of the free printables I find in greater blogland.
This one comes via the Creating Keepsakes site. It is actually a label that will print looking like this:
I opened the .png file with Windows Photo Gallery and was able to print it off as an 8x10 picture. I made sure to uncheck the 'fit picture to frame' box so I didn't lose any of the scrolls around the words.
3 minutes and done. My kind of project.
To see my other 31 Days of Pinterest projects, click on the image below, and it will take you to my original post.
Sunday, October 30, 2011
31 Days of Pinterest: Day 26 Vampire Pumpkins
Vampire Pumpkins (and a Gourd)!
The first time I saw these on Pinterest, I KNEW I was going to make them. The picture cracks me up every time I look at it. Even though Steve thought they looked dumb, Amanda & I made some.
Original inspiration:
(Originally from Martha Stewart)
We went to a local farm to pick up the pumpkins (and gourd). They were $1 each. I got the smaller fangs at WalMart and the colored fangs at Target for less than $2. The pins I found in the fabric section of WalMart for around $3.
We started by roughing out an opening for the fangs to set in. Then we scraped all the guts and seeds out.
Then it was just a matter of sliding in the fangs and putting the quilting pins in for the eyes.
I changed out the black fangs in the pumpkin for green ones because the black ones weren't easily seen from a distance.
And here they are again:
I have them on the kitchen windowsill until tomorrow when they'll go outside to join the other pumpkins.
To see my other 31 Days of Pinterest projects, click on the image below, and it will take you to my original post.
Friday, October 28, 2011
31 Days of Pinterest: Day 24 Framed Key
I've looked for these kinds of keys for awhile, but finally found some at Michael's for $1.50 each.
My inspiration for this project was this (among so many others I've seen):
(Originally from Not Just a Housewife)
I found the unfinished oval wooden frames at Michael's.
I primed them both using Rustoleum's primer. I don't know that they needed it, but I knew I would be spray painting them with a glossy black, so I wasn't taking any chances.
I let the frames dry overnight just to be sure the paint cured well enough to keep going.
I tried different colored scrapbook paper behind the keys before I decided my best bet would be something neutral. I found a picture of some fabric I like and used that. I printed it off on plain white cardstock just to give the backing some stability.
Once I had the paper, I traced the outline of the cardboard backing that had come with the frames onto it. I then glued the cardstock onto that backing using a glue stick, again just for some stability. Then I used the tacky glue to glue the key to the middle of the paper. I put the glue on the spots that actually touched the paper. I may have to go back and run a bead around it, which would be fine because it dries clear.
The last step was to go find a picture hanger thingy for the back. I eyeballed where the middle was, and the level-ness of it and hammered in the nails. The right side looks loose, yes, because it is. I couldn't find my really little nails, so I used what I had. If I'dve hammered that one all the way in, it would've come out the front, which is not exactly the look I'm going for...
I really like how it turned out. I may have to repaint the edges of the frame because the spray paint didn't seem to take as well there, but that can be remedied with ribbon or craft paint.
To see my other 31 Days of Pinterest projects, click on the image below, and it will take you to my original post.
Wednesday, October 26, 2011
31 Days of Pinterest: Day 21 Eyechart Art
This is one of the niftiest projects I've come across. And it's easy. Win-win, right there.
And here's how I did it...
First step:
Go to the Custom Eyechart Maker site.
Second step:
Agonize over what to type in the box at the bottom which will then turn it all into an eyechart. Try to remember a favorite quote. Try to remember ANY quote. Try to remember how to spell things correctly.
Third Step:
Type it in the box.
Fourth Step:
Click on the "Make the Chart!" button.
Fifth Step:
Right click and save that chart to Desktop so there's a chance it can be found again.
Sixth Step:
Print.
Et voilĂ ! Easy art, ready to frame.
*The chart says "Everyone pretend to be normal" (plus 3 extra bonus letters the chartmaker threw in for me). It's a quote from the movie "Little Miss Sunshine" that sums up my own family pretty well...
To see my other 31 Days of Pinterest projects, click on the image below, and it will take you to my original post.
Tuesday, October 25, 2011
31 Days of Pinterest: Day 20 Circle Wall Art
I found the inspiration for this on Pinterest, from a picture that had been pinned from West Elm.
I had an extra small canvas left over from a 2-pack I'd purchased at Michael's, so I thought I'd give it a go.
But, I didn't want to paint it. I know...me not want to paint? What gives?
Actually, I didn't want to have to rinse out my brush after I was done. Too much work.
Then I looked at the original some more and thought, "Huh. I bet Sharpie markers would work OK. And if not...well, I pick another project."
So I got everything I needed together.
The canvas, a medium tip black Sharpie, a fine tip black Sharpie, and 3 different sizes of round things to draw around.
Oh, and Izzy, who woke up from her nap long enough to come see what I was doing.
I didn't have a plan as to what circles should go where. I just took one of the things and traced the outline.
I noticed that the fine-tip Sharpie was unevenly worn, so it was making the lines skip in places, which is fine.
All in all, this took me about 5 minutes. I wasn't going for perfect, I was going for done. One of the things that I know about myself is that if I overthink something, I will NEVER FINISH. I get too caught up in the perfectionism, which also ruins the fun for me.
So, it's not exactly like the original, but it's OK anyway.
To see my other 31 Days of Pinterest projects, click on the image below, and it will take you to my original post.
Subscribe to:
Posts (Atom)