Monday, October 31, 2011
31 Days of Pinterest: Day 27 Crock Pot Hawaiian BBQ Chicken
This is actually something we make at least once a month, but we usually put it in the oven at 350 degrees & cook it for an hour. I thought trying it with the crock pot might be good too, especially for the nights that I work late and can't get dinner started earlier.
Here's the original inspiration:
(Originally from Six Sister's Stuff)
Here's what you need to make this:
Yep, three things. Frozen (or fresh) chicken breasts; a can of pineapple chunks or rings; and a bottle of Barbeque sauce. Plus a crockpot. Easy pacheesy.
From many years of experience with this, spray your pan or crockpot with a non-stick spray first before putting anything in. You'll thank me when it's time for clean-up.
Then, put the first layer of frozen chicken breasts in.
Then add some barbeque sauce and some pineapple. Then add another layer of chicken breasts, BBQ sauce, and pineapple.
To get the last bit of BBQ sauce out of the bottle, I use the pineapple juice from the can.
Now that everything is in there, put the lid on, turn it to high, and let it go for at least 2-3 hours. You can also put it on low for 4-6 hours. Our crockpot was a wedding gift 18 years ago, so it took a little longer, and even though we had it set on high, the chicken wasn't done until 3.5 hours later. But it still was pretty good.
I don't have an after picture...but it looks fairly close to the top one. The level of the liquid will rise as everything cooks, so don't be alarmed that it's not all pretty anymore.
To see my other 31 Days of Pinterest projects, click on the image below, and it will take you to my original post.
Sunday, October 30, 2011
365 Photos Day 303
303/365
The Kid and I spent awhile today carving mini-pumpkins (and a gourd!) and making them into Vampire Pumpkins for one of my 31 Days of Pinterest projects. I think we did OK.
31 Days of Pinterest: Day 26 Vampire Pumpkins
Vampire Pumpkins (and a Gourd)!
The first time I saw these on Pinterest, I KNEW I was going to make them. The picture cracks me up every time I look at it. Even though Steve thought they looked dumb, Amanda & I made some.
Original inspiration:
(Originally from Martha Stewart)
We went to a local farm to pick up the pumpkins (and gourd). They were $1 each. I got the smaller fangs at WalMart and the colored fangs at Target for less than $2. The pins I found in the fabric section of WalMart for around $3.
We started by roughing out an opening for the fangs to set in. Then we scraped all the guts and seeds out.
Then it was just a matter of sliding in the fangs and putting the quilting pins in for the eyes.
I changed out the black fangs in the pumpkin for green ones because the black ones weren't easily seen from a distance.
And here they are again:
I have them on the kitchen windowsill until tomorrow when they'll go outside to join the other pumpkins.
To see my other 31 Days of Pinterest projects, click on the image below, and it will take you to my original post.
31 Days of Pinterest: Day 25 Hydrogen Peroxide and Baking Soda Cleaner
Well. I'm thinking that perhaps most of my projects involving cleaning are not going as planned.
Here's the inspiration:
(Originally from One Good Thing By Jillee)
Doesn't that look great?
Here's my before:
Here's the during:
And here's my after:
It looks better, but some of that could also be the lighting. I put the mixture of Hydrogen Peroxide and Baking Soda on 3 times, and scrubbed hard every time. It wasn't until I broke out an SOS pad that I got anywhere, and that kind of defeats the purpose of it all. The last time I put the goop on, I left it on for almost an hour and it still didn't help.
Ah, well. Maybe it's just me.
To see my other 31 Days of Pinterest projects, click on the image below, and it will take you to my original post.
365 Photos Day 302
302/365
The really super great thing about some of my 31 Days of Pinterest projects is that I am made aware of cuts on my hands that I never even knew were there.
Today's project involved cleaning a pan with a mixture of baking soda and peroxide.
Ow. (And the pan looks pretty much like it did before, so it was a lose-lose kind of thing)
365 Photos Day 301
301/365
I think we're ready for Halloween and the trick or treaters that will be coming to the house.
Or we're gearing up for a sugar coma.
Either or. We're ready.
Friday, October 28, 2011
31 Days of Pinterest: Day 24 Framed Key
I've looked for these kinds of keys for awhile, but finally found some at Michael's for $1.50 each.
My inspiration for this project was this (among so many others I've seen):
(Originally from Not Just a Housewife)
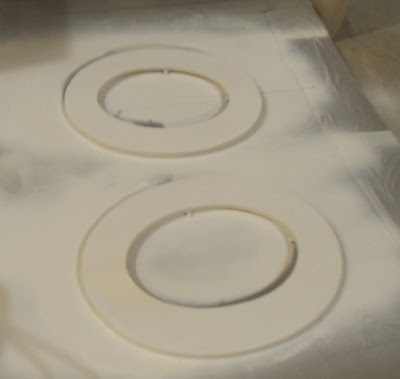
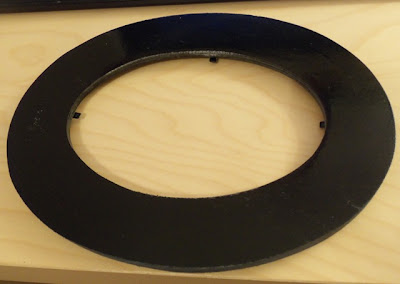
I found the unfinished oval wooden frames at Michael's.
I primed them both using Rustoleum's primer. I don't know that they needed it, but I knew I would be spray painting them with a glossy black, so I wasn't taking any chances.
I let the frames dry overnight just to be sure the paint cured well enough to keep going.
I tried different colored scrapbook paper behind the keys before I decided my best bet would be something neutral. I found a picture of some fabric I like and used that. I printed it off on plain white cardstock just to give the backing some stability.
Once I had the paper, I traced the outline of the cardboard backing that had come with the frames onto it. I then glued the cardstock onto that backing using a glue stick, again just for some stability. Then I used the tacky glue to glue the key to the middle of the paper. I put the glue on the spots that actually touched the paper. I may have to go back and run a bead around it, which would be fine because it dries clear.
The last step was to go find a picture hanger thingy for the back. I eyeballed where the middle was, and the level-ness of it and hammered in the nails. The right side looks loose, yes, because it is. I couldn't find my really little nails, so I used what I had. If I'dve hammered that one all the way in, it would've come out the front, which is not exactly the look I'm going for...
I really like how it turned out. I may have to repaint the edges of the frame because the spray paint didn't seem to take as well there, but that can be remedied with ribbon or craft paint.
To see my other 31 Days of Pinterest projects, click on the image below, and it will take you to my original post.
31 Days of Pinterest: Day 23 Flaming Softball Senior Pictures (Take 1)
I'm not taking the Kid's senior pictures. We have a family friend who's wanted to for years, and it's what she does (and does quite well), so I'm glad to let her do them.
However, one request Amanda had was that we figure out how to do some softball pictures where the softball was on fire. We have other family friends who had their pictures taken with flaming footballs, so we asked how it was done. They thought with rubber cement.
Yep. Rubber cement.
We gobbed it onto the ball, she got ready, I lit the match and held it to the goop, and HOLY CRAP THAT FLAME IS SOOOOO COOL!!!!
We may or may not have kept putting some on "just to make sure it works".
The rubber cement burns, but not the object it's put onto. However, said object is still kind of sticky, so beware. The flame burns pretty well, but then tapers off after 10 seconds or so. Plenty of time to get in a good shot or two. Or three and a video if you're like me and hit the wrong buttons on the camera...
This was really really fun.
The inspiration shot was:
(Originally from Northrup Photo's Flickr page)
To see my other 31 Days of Pinterest projects, click on the image below, and it will take you to my original post.
Thursday, October 27, 2011
365 Photos Day 300
300/365
It's about time to start thinking about getting the Kid's senior pictures taken. Since she spends so much time on a softball field, it seems appropriate that some of her pictures be taken on one.
Today we decided to see if we could make the pictures even cooler by figuring out how to light a softball on fire. A liberal amount of rubber cement will do the trick.
This was taken juuuust before the wind shifted back toward her glove, causing us both to jump away from the flame (it would be Very Bad if that glove caught on fire...it took too long to break in. Well, and her hand would still be in it too). Her smile is so big because we'd just been saying, "Holy crap, look at the size of that flame!!!!"
I think it'll be fun seeing what the photographer can do with her. And the flaming softball.
31 Days of Pinterest: Day 22 Lucky Penny art
I saw this pin on Pinterest and thought it was neat because it could be personalized to the people who ordered it.
(Originally from the Etsy shop of patsdesign)
It wasn't until I came across this gallery wall explanation at Our Humble A{bowe}d that I thought about actually doing anything with the pennies.
Here's her picture of what caught my eye:
(Originally from Our Humble A{bowe}d)
I sorted through our mound of pennies to find ones with everyone's birthdays. When I found them all, I decided to try and clean them up a little by using plain old ketchup.
After a couple of go-rounds, they were nice and shiny. Or shinier than they had been, anyhow. The only downside was that my hands were ketchup scented all night, no matter how many times I washed them.
Then, I just glued them in a vertical line onto a scrap piece of scrapbook paper with Aleene's Tacky Glue.
While they were drying, I found another piece of scrapbook paper that I thought looked good. It also had the added benefit of having a pattern with straight lines so I could line up my penny row without a whole lot of measuring when I got that far. Work smarter, not harder. Yep.
Once I cut that paper to fit in the 5x7 frame, I set the penny row on it and taped the top and bottom of the two papers together. The last step was to put it all together in the frame.
Ta-da! Another easy project!
To see my other 31 Days of Pinterest projects, click on the image below, and it will take you to my original post.
Subscribe to:
Comments (Atom)


